Monday, October 17, 2016

A Lesson in Never Painting Brick

We've talked about this project previously, but I have to say that one of the most time-consuming things we've done in our olive on Olive is to remove the paint from the brick stack in the kitchen. But now that it's complete, I couldn't be happier! And a note if you're thinking about painting brick: don't!! The look of exposed brick (if it's a good color and in good shape) is full of so much more character than painted brick. And if you ever change your mind about wanting it exposed/original vs. painted, it's a nightmare to get that paint off!

We started this project in late January. I researched online and found that Citristrip was a recommended choice for paint stripper. It doesn't stink as bad and is effective at removing paint.

Stripping paint is slow and not fun. But we do like Citristrip for those times when you have no choice but to strip paint.

So I taped off around the brick, grabbed an old paint brush to apply the stripper to the brick, and went at it. I wore heavy gloves and used a scraper (for lack of a better term) and a stiff-bristled brush to remove the paint. And it took FOREVER.

I spread plastic out on the floor to protect the brick, and poured the stripper on a large piece of aluminum foil to "slop" it up with my paint brush.

After an hour or two of scrubbing at this section of wall, I had managed to do this:

I quickly realized this wasn't going to be easy. So I worked for several hours over the next few days, scraping away at that brick. I found you basically had to remove the top layer of the brick to really get the paint off. The stiff bristled brush would leave marks in the brick (which were kind of soft) so I used it sparingly. When I did have to use it, afterward I would go over that brick with a stripping pad to smooth it back out.

Several days later, I'd managed to get us to this point:


Which is how it stayed for quite some time. We transferred our Baby Nolan embryo in early February, so I immediately stopped using the stripper and didn't need to be around the fumes.

Enter my mom and dad. I have to poke a little fun at them here because they said they'd come up and work on the brick to help us out. Dad kept saying it wouldn't take long at all. Then they came and tried to work on it and realized how painstakingly terrible it is to remove paint from all porous brick. They talked to a local paint shop that recommended a different stripper, tried it, and it was no better.

So life happens, and the brick stayed partially uncovered like this for several months.

Fast forward to a couple months ago. I'm very pregnant, and Dad is getting ready to have knee surgery. He and Mom decided they were going to get that brick uncovered before he'd been down and out for several weeks after having his knee replaced. With a renewed sense of energy :) they tackled the project again. This time, they brought out the heavy machinery. I believe a Dremel, a rotary tool, and a sander were all used to tackle the brick. The work went much faster this time. They figured out not to let the stripper stay on the brick for as long and that helped as well. In a matter of a few days, the brick were uncovered!

I was so excited to come home and see this progress!

The beautiful exposed, not painted brick!

This project had been a thorn in my side because I wasn't able to get it done before we got pregnant. I hate leaving things unfinished, and I hate feeling helpless, but it obviously wasn't worth risking Nolan's health for me to strip paint off of brick. We really appreciate all of Mom and Dad's work on getting the brick uncovered! It's so nice to walk in the house and see that punch of color and character that before had just blended in with the walls and cabinets. 

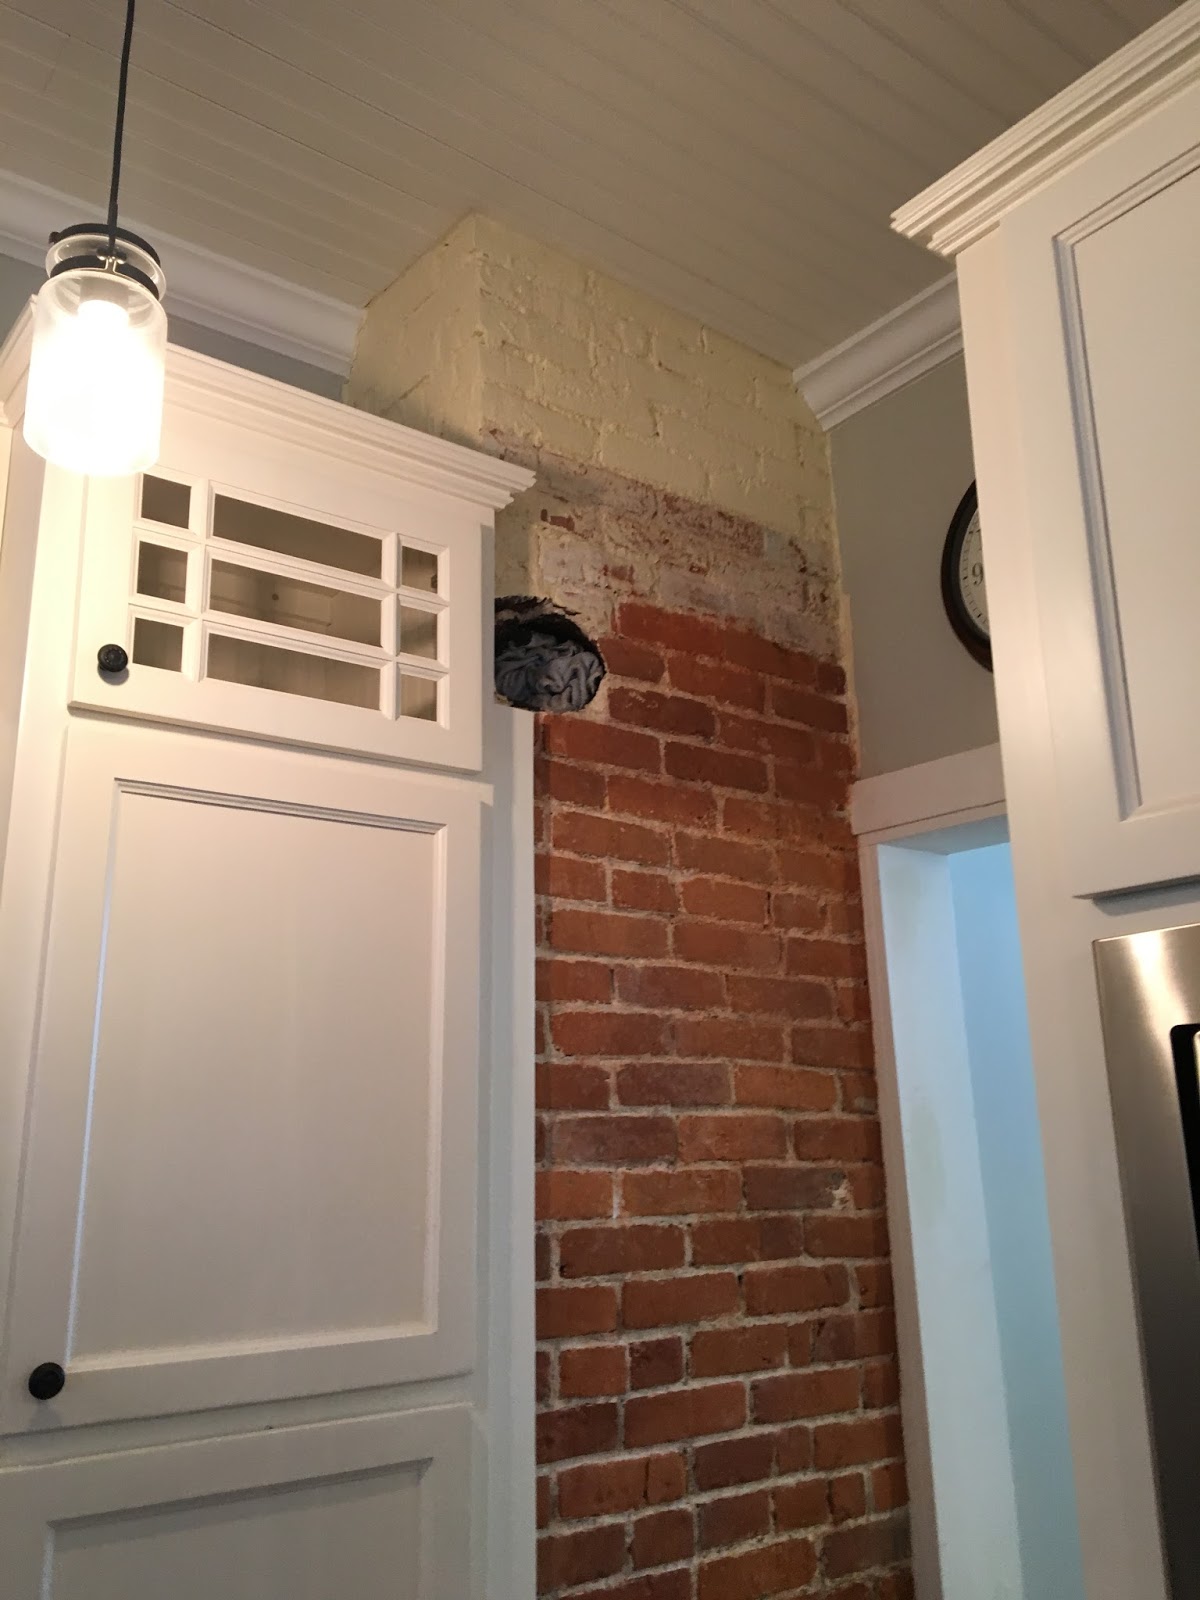
There is a hole in the brick stack where a pipe was previously installed. We do plan on getting a brick mason to fill that hole when we have one come to help with the upstairs portion of this stack and some work we want to do in the dining room. Until then, we've covered it up with a flue cover, and are enjoying our beautiful finished kitchen!

The finished product - we love our exposed brick!

Wednesday, September 7, 2016

Raising the Roof...well, the Ceiling

We took Labor Day weekend literally and worked our tails off all weekend long! I'm really excited to share this update though. The work we did was well worth it once we could sit back and take in the finished product.

Our focus was on Nolan's room, and specifically on his ceiling. You'll remember from my last post that we had planned to expose the shiplap on his ceiling, but once we tore down the sheetrock, there was too much coal dust for us to leave that wood exposed. So we moved to Plan B, which consisted of sealing the ceiling using some insulation, then adding our own shiplap on top.

This has been our view for the past few weeks - the insulation that we placed to seal the ceiling.

As I mentioned in my last post, we found some old wood at our local lumberyard, and David stained the large planks. He then ripped them on the table saw to get them as close to the width of the shiplap we have throughout the house while minimizing waste of the boards. Once he had ripped them down, he used a dado blade on his table saw to cut the 1/4-inch lap so that the boards would fit snuggly together. (We decided to cut lap instead of tongue and groove to help make the install much easier - and I'm glad we did!) We then stained the lap on either side of the board so you wouldn't see raw wood once the boards were on the ceiling.

We attached the boards using a pneumatic nailer. We figured out a pretty good system for getting them up there, which involved the use of two ladders and some scaffolding that David would walk across to get from one side of the room to the other so he could nail the boards in place.

We started the install on Friday night and were very excited at how easily the boards went up!

I can't believe how easy it was to install the boards. Install took us probably 6 hours total. We had no idea going into it how hard it would be. Probably the hardest part was getting all the boards from the garage up to Nolan's room!

David nailing the final piece in place.

We only had to make a couple of cuts: one for the center of the room where the wiring is for the light; and the other to rip the last board so it would fit.

Once we took a quick break from the install, we started working on the crown molding. If only it had been as easy to hang...

This is a 100+ year old house. It's not square (even if it was a year old it probably wouldn't be square!). So we knew installing crown wasn't going to be easy. But we did it, and with a little caulk here and there, it looks amazing!

The finished product, with crown installed.

I didn't let David rest much after installing the crown. We installed a ceiling fan, hung the curtains (beautifully made by David's mom), and moved a couple pieces of furniture into the room. It is starting to feel like a little boy's room, and is making us more and more ready to have Baby Nolan here!

I need to steam the curtains now that they're hung and do a million other things, but here's a little sneak peek of Nolan's nursery decor.

More photos to come once we finish his room, but for now you can find me rocking in his chair, enjoying his room and being so grateful that the ceiling and crown install is complete!

Wednesday, August 31, 2016

Starting on the Nursery

We have three bedrooms upstairs, and one of them has been used as the guest room thus far. Now we are transforming it into Nolan's nursery.

We had two major projects in the room: exposing the shiplap ceiling and closing in the door that exists between the room and the sleeping porch.

Exposing the Shiplap Ceiling
From our experience with the ceiling in the sleeping porch/playroom, we knew that exposing the shiplap in Nolan's room could prove to be a big undertaking. But never ones to shy away from extra work (ugh), we thought we'd give it a shot anyway. Our biggest concern, again from our previous ceiling experience, was the potential for coal dust to seep through the shiplap. That concern was very valid, as evidenced by my soot-covered husband and dad as they worked to tear down the sheetrock. The sheetrock came down easily, as did the cheesecloth and wallpaper that was over the shiplap. As did the coal dust.

A little bit of cheesecloth, a little bit of paper, a little bit of sheetrock, a lot of coal dust

This was a very messy job!

We immediately knew we would need to cover that ceiling and install our own shiplap. We installed a foil insulation to provide a barrier between the attic and the room, and to seal the coal dust so it wouldn't filter through the new boards.

We knew we wanted to stain some wood to match the shiplap throughout the house, so headed to our local lumberyard. We had no idea that they had some old wood on hand, but when we found these old floorboards, we knew we had just what we needed!

The planks on the left are the raw wood we got from our local lumberyard.

David has stained and polyurethaned the boards. We're letting them air out in the garage, and plan to rip the planks down into three boards, mill a lap onto either side of the board, then install on Nolan's ceiling this weekend!

Removing the Door

There was a door that connected Nolan's room to the sleeping porch/playroom that we just didn't need. The hall right outside our bedrooms leads straight to that room. We've never used it; in fact, the guest bed and nightstand sat directly in front of it. So we closed it in. David removed the door and frame, attached new studs, and sheetrocked over the space, then mudded and sanded and mudded and sanded and mudded and sanded. As for the playroom, right now it's just open studs where the door used to be. When we tackle that room, we will add shiplap there to match the rest of that room. That's another project for another day!

Nolan's nursery as our guest bedroom, with the door to the sleeping porch on the left.

Studs in place and ready for the sheetrock

The doorway patched up and ready to paint

Painting
Nothing makes a room feel better than a fresh coat of paint. It's an instant facelift and room brightener. I've mentioned before that Bri Moysa with Emerson Grey Designs designed Sagan's nursery, then several spaces in our old house, and now several in our new (old) house. I struggle to make decisions on decor without her help! So as soon as we knew that baby #2 was a boy, we requested Bri's help with designing Nolan's nursery. More details on that to come, but for his walls she chose Benjamin Moore's Seattle Mist. It's the perfect neutral for his room, and makes it feel so much lighter and airier.

I've sung its praises before, but Sherwin William's Pro Classic trim paint is amazing. Painting the trim is the first thing we do in a room, and it's amazing what an instant and dramatic impact it has. When I know we will be priming and painting the walls, I paint the trim and even up onto the wall to make sure any stray wall color is completely hidden.

I love the bright white (left) we have chosen for the trim throughout the house

The lighting in this picture is terrible (while the ceiling is down, we are using a couple of shadeless lamps to light the room) but the paint in Nolan's room is finished!

We have a few more projects to tackle in Nolan's room, then we can finally start placing furniture and art. This mama is ready to start nesting in there. We can't wait to see the room start to come together!

Wednesday, August 24, 2016

Built-Ins, Crown & Baseboards

The past couple of weeks have been filled with working on the house. A lot! It's insane and exciting how much progress we've made toward finishing the living room and on the nursery. A couple of highlights are below:

1. Living Room Built-Ins
Next to the fireplace in the living room, we will place two cabinets with drawers, and then above those will be shelves lining the exposed shiplap to the ceiling. In order to finish the baseboards around the living room, we have to get these cabinets in place. In order to install the crown molding around the living room, we have to get these cabinets in place. So David has tackled those.

We started with standard builder's grade cabinets from Lowe's. They were a bit too deep, so David cut the backs off of them. We also wanted to build them up in height so the baseboards could wrap around the front of them, so he attached the cabinets to each other and then built a base on which they could rest, raising the height.

He also added trim on either side to extend the built-ins to fill the space. This weekend Dad helped David get the cabinets moved into the living room, then David set them in place, leveled them, and attached them to the walls.

Sliding the cabinets into place. They haven't been painted yet; just primed.

We didn't want to go with the standard grade doors and drawer fronts that came on the cabinets. We'd looked into buying custom fronts, but they're so expensive that we looked into some alternatives. One such was buying a router bit that he could use to make the cabinet doors look like those in our kitchen. He finished the doors last night, and I love how they turned out! Next up we need to sand, prime, and paint!

David made the cabinet doors for the built-ins...can't wait to see them installed!

Prior to placing the cabinets in place, we ran wiring to above the mantel which is where we'll hang the TV. The Xbox, cable box, and all that fun stuff will sit in the cabinets, and the wiring runs through the wall to get to where we'll hang the TV. Progress!

2. Crowning the Windows and Doors

Have you ever found something you really like, can't find it anywhere locally, try to find a suitable replacement, and had no luck? That was us with this piece of trim. Check out Windsor One trim if you are super nerdy and want to see some beautiful stuff! Their catalog is what David based the window and door trim in the living room off of. It's gorgeous! And what makes it really gorgeous is the top piece of header crown. Which is nowhere to be found locally. Or anywhere in the four-state area. Trust me - I called every dealer and distributor. I ended up calling Windsor One direct and had the most helpful gentleman give me the name of a couple stores that he knew would have it in stock and would work with us. I spoke to a nice gentleman at Horner Millwork, and for a very nominal shipping charge, we received six 8-foot pieces a couple of days later from Massachusetts. I'm sure he thought we were nuts, but we love the finished product. 


So now that we've installed it and seen how it's the perfect cap to our new window trim, how will we get it for the rest of this old house? The fine folks at Windsor One have offered to help us work with their local-ish sales team and distributors to find someone who will get it for us without charging us the not-so-nominal shipping price of $250+ that we first ran into (Horner shipped it to us for $40, so much more reasonable)!


We haven't painted the window trim yet, but love the new crown piece we added to the top!

3. Began Installing Baseboard
Trim might be the bane of our existence. David is great at it, but it's tedious work! As you may recall, we took up a couple runs of shiplap around the bottom of our living room walls, allowing us to seal with spray foam insulation and caulk, and allowing the electrician to run wiring to install new outlets. We put sheetrock back over that months ago. Fast forward to a couple weekends ago when we wanted to install the new baseboards. And couldn't. Because we couldn't for the life of us find the studs. Stud finder wouldn't work. Measuring from the windows or known studs wouldn't work. So we got smart. We pulled back off those pieces of sheetrock, cut them down into small strips, and reattached those strips at each stud (had to do this to ensure the wall depth was consistent with the remainder of the wall). And voila! We were able to easily see the studs and attach the bottom piece of the baseboard. Quirky? Sure. Successful? Absolutely!


Our baseboard is a little complicated. David got a router...need I say more? :) The baseboard is actually three separate pieces that attach to one another then attach to the wall. David ripped the main board, then milled two different pieces of trim with the router to create this unique profile. It's so pretty, nobody else will have anything like it, but it stays true to the style of the house. Once we finish the built-ins, we can finish installing the baseboard throughout the room. Like the windows, it will need to be painted once we have it installed.

We love the detail of the baseboard, with its three parts.

Here you can see the the bottom board, the thin piece that sticks out, and then the top piece that rests against the wall.

There are many more projects we've been working on - stay tuned for more updates as we work quickly on Operation: Finish Two Rooms before Nolan Arrives!